A Practical Guide to Proxmox High Availability
Soraxus Assistant
January 14, 2026 • 24 min read

Proxmox High Availability, or HA, is a powerful built-in feature that keeps your services online even when a server completely fails. It automatically spots a dead node and, within moments, restarts its virtual machines and containers on another healthy server in the cluster. We're often talking about recovery in under a minute, all without you having to lift a finger. This is how you build a truly resilient, self-healing virtualization platform.
Understanding the Foundations of Proxmox HA
Before you even think about deploying a VM, you need to get your head around the core concepts that make Proxmox HA tick. It’s not just one tool; it’s a collection of components working in concert to hunt down and eliminate single points of failure. Understanding how these pieces fit together is the key to building an infrastructure that can shrug off unexpected outages.
The goal here is to move from a reactive "firefighting" mode to a proactive, stable state. Instead of getting a frantic alert at 3 AM about a server crash, a well-configured HA cluster just handles it. The problem solves itself, shifting your focus from emergency recovery to planned, preventative maintenance.
The Core Components of Proxmox HA
A few key technologies are the bedrock of any Proxmox HA setup. Each one has a specific job to do, and they all have to work flawlessly to keep the cluster stable and automate failover.
- The HA Manager: This is the brains of the operation. It's the high-level service that watches over your designated VMs and containers. You tell it which resources are critical, and the HA Manager makes sure they get restarted on a healthy node if their current host goes down. For example, if you mark your primary database VM as an HA resource, the manager will ensure it's always running on one of the cluster nodes.
- Corosync: Think of this as the cluster's private, high-speed communication network. Corosync handles the messaging between all the nodes, making sure they all agree on the state of the cluster. It’s how one server knows, for certain, that another one has dropped offline.
- Fencing: This is, without a doubt, the most critical safety mechanism in the entire system. Fencing is the process of completely isolating a failed node to prevent data corruption. If a node becomes unresponsive but isn't truly powered off, fencing forcibly shuts it down before its resources (like shared storage) are brought up somewhere else.
A classic mistake is cutting corners on fencing. Without it, you're inviting a "split-brain" disaster, where two nodes think they own the same disk. This leads to catastrophic data corruption. For any production setup, proper fencing is absolutely non-negotiable.
The Rule of Three: Why Quorum Matters
The concept of quorum is central to how a Proxmox cluster makes decisions and maintains stability. For the cluster to remain active, a clear majority of nodes must be online and in constant communication. This is precisely why a minimum of three nodes is the gold standard for any serious HA deployment.
With three nodes, if one fails, the other two still represent a majority (2 out of 3). They can safely make decisions and continue running the cluster. But if you only have two nodes and one fails, the survivor can't form a majority on its own. To prevent data corruption, the HA manager will stop all services. The three-node minimum isn't just a suggestion; it's the golden rule for building a system you can actually rely on.
This kind of robust, built-in functionality is exactly why Proxmox VE has seen such massive adoption. Its HA capabilities have driven incredible growth, with projections showing over 1.5 million hosts deployed worldwide by 2025—that's a staggering 650% increase from around 200,000 in 2018. Having an integrated HA manager that automates failover without expensive licensing has made it a go-to choice, particularly in Europe and other rapidly expanding markets. You can dig deeper into these global Proxmox adoption trends on saturnme.com.
Designing Your Bulletproof Cluster Architecture
A truly resilient Proxmox HA setup isn’t just about running a few commands. It’s built on a solid architectural foundation. Before you even think about initializing a cluster, getting your hardware, networking, and management layers right will save you a world of pain later on. This blueprint is all about making deliberate choices that lead to a stable, predictable, and genuinely fault-tolerant environment.
It all starts with the physical machines. It might seem like a minor detail, but using consistent hardware across all your cluster nodes is one of the most important things you can do for reliable operations. This is especially true when it comes to the CPU.
Hardware Consistency Is Key
For live migrations to work flawlessly—a core function you'll rely on constantly—the CPUs in every node need to be compatible. In a perfect world, they're identical models from the same vendor and family. Trying to live-migrate a VM from an Intel CPU to an AMD one is a non-starter, and even big generational gaps within the same brand can throw a wrench in the works.
- CPU Consistency: My advice? Stick to identical or at least very similar CPU models across your nodes. This makes live migrations fast and dependable without forcing you to use CPU compatibility masks that can hamstring performance.
- Memory and Storage: While it's not as critical as the CPU, having the same amount of RAM and similar storage types (like all NVMe or all enterprise SSDs) helps create a balanced cluster where no single node becomes a performance bottleneck.
This level of control over hardware is a key advantage you get with your own gear. If you want to dive deeper into this topic, you can see how it compares in this breakdown of dedicated servers vs VPS. Homogeneous hardware simply removes variables, making your cluster’s behavior far more predictable when a failover event actually happens.
This diagram illustrates the core process flow of Proxmox HA, moving from cluster communication with Corosync, to achieving Quorum, and finally executing Fencing.
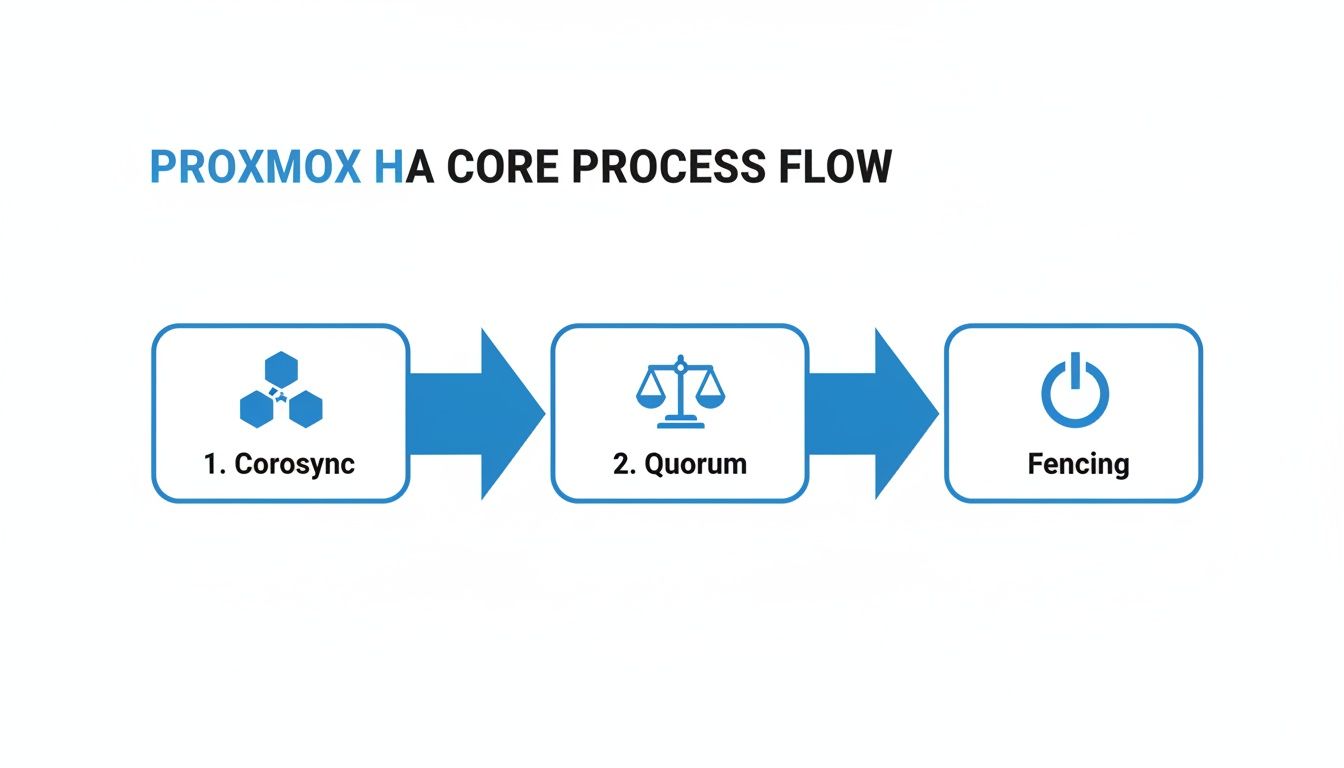
Seeing it visually really helps connect how these three distinct stages work in concert to ensure a safe and automated recovery when a node fails.
Architecting a Redundant Network
Think of your network as the cluster's nervous system. If nodes can't talk to each other reliably, quorum is lost, and the whole HA promise falls apart. Putting all your traffic—management, storage, and cluster communication—on a single network connection is just asking for trouble.
A robust design needs physically separate, redundant network paths. The go-to best practice is using network bonding (like LACP or a simple active-backup) to create resilient links for different types of traffic. This simple step prevents a single switch failure or a bad cable from taking down your entire cluster.
Let's walk through a real-world example using a three-node cluster where each server has four network ports.
- Management Network (bond0): I'd bond ports
eno1andeno2together and connect them to my primary LAN switch. This is for accessing the Proxmox web UI and for general VM traffic. - Corosync Ring (bond1): Then, I'd take ports
eno3andeno4, bond them, and connect them to a completely separate, dedicated switch. This private network is only for cluster communication, ensuring those critical heartbeat messages are never delayed by other traffic. - Storage Network: If you're running network-heavy storage like Ceph or iSCSI, you can create a dedicated VLAN on that Corosync switch or use another set of NICs to isolate that high-throughput traffic.
This separation is absolutely vital. Corosync is extremely sensitive to latency. By giving it a private, uncongested network, you drastically lower the risk of false-positive node failures and help prevent nightmare split-brain scenarios.
The Non-Negotiable Role of Fencing and OOBM
Out-of-band management (OOBM) isn't a luxury in a Proxmox HA cluster; it's a hard requirement for reliable fencing. Whether it's IPMI, Dell's iDRAC, or HPE's iLO, this is the mechanism that lets Proxmox forcefully power off a misbehaving node to guarantee it's truly offline before its services are started elsewhere.
Without OOBM, Proxmox has no reliable way to issue that power-off command. It's like trying to shut down a frozen computer when you can't reach the power button. Fencing is what protects your data integrity by preventing a "zombie" node from corrupting shared storage.
You'll configure your fencing devices within the datacenter settings, tying each one to a node's OOBM interface. When Corosync declares a node "down," the HA manager uses this dedicated channel to forcibly shut it down, clearing the path for a safe and clean recovery of its VMs on a healthy node.
Choosing the Right Shared Storage Strategy
A rock-solid Proxmox high availability cluster lives and dies by its shared storage. This is where all your virtual machine and container disks live, making it possible for any node to instantly take over when another one fails. Frankly, getting this piece right is non-negotiable; your choice here directly impacts cluster performance, how easily you can scale, and how complex your setup will be.
It's not just about picking the fastest technology off a spec sheet. You have to match the storage solution to your actual needs. Are you better off with a tightly integrated, hyper-converged system, or does the simplicity of a traditional, dedicated storage server make more sense? Each path has its own trade-offs depending on your budget, your team's skillset, and your performance targets.

Ceph: The Hyper-Converged Powerhouse
Ceph is baked right into Proxmox VE, making it the go-to for building a true hyper-converged infrastructure (HCI). In an HCI setup, your compute and storage resources all live on the same physical servers. This completely eliminates the need for a separate, often expensive, storage appliance and is a wonderfully efficient way to build.
As you add new Proxmox nodes to your cluster, you just add their local disks to the Ceph pool. It’s that simple. Your storage capacity and performance scale out right alongside your compute power. Under the hood, Ceph is a beast, automatically handling data distribution, replication, and self-healing. If a disk dies, Ceph just starts rebuilding its data onto other disks in the cluster—no late-night calls or manual intervention required.
Ceph is more than just storage; it's a distributed storage system that makes the storage layer itself highly available. This is a game-changer because it removes the shared storage as a single point of failure—a common Achilles' heel in simpler HA setups.
Of course, all that power comes with some complexity. You'll need a dedicated, high-speed network for Ceph traffic (think 10GbE at a minimum) and at least three nodes for it to work reliably. The learning curve is a bit steeper, but for anyone building a serious, scalable, and ultra-resilient Proxmox HA environment, the upfront investment is well worth it.
ZFS Over iSCSI: A Balance of Integrity and Performance
Another fantastic strategy is to use a dedicated server running ZFS and share its storage out to the Proxmox cluster using iSCSI. ZFS is legendary for its data integrity features, like built-in checksums that kill silent data corruption, copy-on-write, and incredibly powerful snapshotting tools.
Here’s a common real-world scenario: you build a dedicated storage server with a big ZFS RAID-Z2 array. You then carve out a ZVOL (which is essentially a block device living on your ZFS pool) and share it as an iSCSI target. Your Proxmox nodes connect to this target as iSCSI initiators, and the shared storage just appears like another local disk to them.
This approach gives you some great benefits:
- Rock-Solid Data Protection: You get all the enterprise-grade integrity features of ZFS protecting your precious VM disks.
- Great Performance: iSCSI offers block-level access, which is generally much faster for databases and other I/O-heavy workloads than file-level protocols.
- Separation of Concerns: Keeping storage and compute separate can make troubleshooting much more straightforward.
The main catch? The ZFS server itself becomes a potential single point of failure. To get around this, you'd need to build a highly available storage "head," which usually means a second server and some form of replication software. This definitely adds to the cost and complexity. When you start architecting redundant hardware, understanding the real-world cost of colocation becomes critical for budgeting properly.
NFS: The Simple and Reliable Choice
Last but not least, there's NFS (Network File System). It might not have the hyper-converged coolness of Ceph or the raw block-level speed of iSCSI, but setting up an NFS share is often the simplest and most cost-effective way to get shared storage for a Proxmox cluster. It’s incredibly easy to set up and just plain works.
You can use a dedicated NAS appliance or even a basic Linux server to export a directory via NFS. Your Proxmox nodes then mount this share and can immediately start storing VM disk images on it. This is a perfect solution for dev environments, home labs, or even production workloads that aren't constantly hammering the disk with I/O.
Don't let the simplicity fool you into being careless, though. For any production environment, you absolutely must ensure the NFS server itself is built for reliability. We're talking enterprise-grade hardware with redundant power supplies, bonded network connections, and a resilient disk array like RAID 6 or RAID 10.
Comparison of Proxmox HA Storage Options
Choosing the right shared storage is a critical decision point. This table breaks down the core differences between the three main options to help you align a solution with your specific technical and business needs.
| Storage Type | Best Use Case | Scalability | Performance Profile | Complexity |
|---|---|---|---|---|
| Ceph | Hyper-converged infrastructure (HCI), large-scale | Excellent; scales compute and storage together | Good all-around, great for mixed workloads | High |
| ZFS over iSCSI | I/O-intensive workloads (e.g., databases) | Good; scales by upgrading the storage server | Excellent block-level performance | Medium |
| NFS | General use, dev/test environments, simple setups | Limited; dependent on the single NFS server | Good for file-level access, less ideal for I/O | Low |
Ultimately, Ceph offers the most integrated and scalable solution, ZFS over iSCSI provides top-tier performance and data integrity for specific workloads, and NFS remains the king of simplicity for getting a cluster up and running quickly.
Configuring and Managing HA Resources
Alright, you've done the heavy lifting—the cluster is up, and your shared storage is humming along. Now for the fun part: telling Proxmox exactly what to protect and how to do it. This is where we bring your virtual machines and containers under the wing of the High Availability Manager and turn all that planning into a real-world recovery strategy.
This isn't just about flipping a switch. You're about to define an intelligent, predictable failover plan, dictating the startup order for your applications and the exact steps Proxmox should take to get them back online after a hiccup.
Creating and Managing HA Groups
First things first, let's talk about HA Groups. Think of them as logical buckets for your cluster nodes. They're a fantastic way to control exactly where your VMs are allowed to run, which is incredibly useful for all sorts of scenarios, from managing software licenses to creating different tiers of service.
For instance, you might have a few beefy nodes loaded with fast CPUs and NVMe storage. You could bundle these into a "Production" group for your most critical database servers. Then, you could take your older, less powerful hardware and create a "Dev-Test" group for environments that don't need the same horsepower.
Here’s what that looks like in practice:
- Production Group: Made up of
pve-node-01,pve-node-02, andpve-node-03. This is where all your mission-critical VMs live. - Dev-Test Group: Consists of
pve-node-04andpve-node-05, keeping non-essential services neatly isolated from your production iron.
By setting up groups like this, you guarantee that a VM failing on pve-node-01 will only ever be recovered on another node inside that same Production Group.
A Quick Pro-Tip: Keep an eye out for the
nofailbackpolicy option on your groups. By default, when a failed node rejoins the cluster, Proxmox will try to migrate VMs back to their original "home." Enablingnofailbackstops this from happening, which is a lifesaver if a node is unstable or "flapping" and you want to avoid a storm of unnecessary migrations.
Defining Resource Startup Priority
With your groups in place, it’s time to add your VMs and containers to the HA configuration from the Datacenter -> HA panel. The single most important setting you’ll touch here is the startup priority. It’s just a number, but it dictates the entire recovery sequence during a widespread failure.
It's simple: higher numbers mean higher priority. This is how you ensure your most foundational services come online first.
Let's take a classic three-tier application as an example—a database, an app server, and a web front-end. You'd set the priorities like this:
- Database VM (
db-server-01): Priority 20. This is the heart of your application; nothing else works without it, so it absolutely must start first. - Application VM (
app-server-01): Priority 10. This server depends on the database, so it gets to boot up next. - Web Server VM (
web-server-01): Priority 5. The web front-end is the final piece of the puzzle and can only function once the application server is ready.
This ordered approach is critical for preventing a cascade of application errors. Without it, your web server might boot instantly, only to throw errors because it can't find the database, which is still starting up.
Understanding HA Policies and States
When you add a resource to HA, you're not just enabling failover; you're also telling Proxmox what its desired state should be. At its core, Proxmox HA is a state machine. You declare the state you want (usually started), and the HA manager works tirelessly to make it so.
There are a few key policies and states to get familiar with:
| HA Policy | Description | When to Use It |
|---|---|---|
| Restart | This is the default and your go-to for unplanned outages. If a service dies, Proxmox first tries to restart it on the same node. If the whole node is gone, it moves the service to another available node and starts it there. | Perfect for most stateful applications like databases or any critical VM that needs to be online, period. |
| Migrate | This is the more graceful option for planned downtime. If you properly shut down a node (for maintenance, perhaps), Proxmox will live-migrate its HA-protected services to another node before the shutdown finishes. | Use this when you're applying updates or doing hardware maintenance. It offers a true zero-downtime experience for your users. |
| Freeze/Ignore | These states are your "hands-off" signals. They tell the HA manager to temporarily stop monitoring a resource, which is invaluable when you need to perform manual work on a VM without triggering an unwanted failover. | Essential when you're troubleshooting a specific guest and don't want the HA manager getting in your way. |
The choice between Restart and Migrate really comes down to the situation. Restart is your safety net for when things unexpectedly break. Migrate is your tool for making planned maintenance a complete non-event. Using these policies wisely is the key to creating a truly robust and graceful recovery process for your most important workloads.
Validating Your Cluster with Real-World Failover Tests
A Proxmox HA cluster looks great on paper, but theory is cheap. Until you've actually pulled the plug—literally—and watched your critical services come back online automatically, you just have a plan, not a proven system. The only way to gain real confidence is to put your setup through its paces with controlled, real-world failure simulations.
This isn't about creating chaos for the sake of it. It's about methodically validating every piece of the puzzle. Through structured testing, you get to see how the HA manager, Corosync, and your fencing mechanisms actually behave under pressure. You’ll confirm that everything fails over gracefully and, just as importantly, within your expected timeframe.

Simulating a Full Node Failure
The ultimate test is a catastrophic hardware failure. This is where your out-of-band management tools like IPMI, iDRAC, or iLO really shine. Don't just run a reboot command from the terminal; that’s far too polite. You need to simulate an abrupt, unexpected power loss.
Get into your node's IPMI interface and hit the "Power Off" or "Hard Reset" button. This is the real-world equivalent of a failed power supply or someone yanking the cord out of the wall. It’s sudden and unforgiving.
What to Expect:
- Almost immediately, the other nodes in the cluster will notice the missing Corosync heartbeat from the "dead" node.
- Once quorum is solid and the downed node is successfully fenced, the HA manager gets to work recovering its assigned VMs and containers.
- You should see those VMs starting up on a surviving node. A recovery time of under 60 seconds is an excellent target for a well-configured cluster.
Once the test is done, power the node back on. Watch it rejoin the cluster, resynchronize its storage (if needed), and become ready to carry workloads again.
Testing Network Redundancy
A network outage can be just as damaging as a full node going down. This next test is all about making sure your redundant Corosync network link is doing its job. It's simple: just unplug the primary network cable for the cluster communication link on one of your nodes.
By simulating these failures in a controlled environment, you're doing more than just testing Proxmox. You're validating the entire stack—your network design, storage configuration, and even the resilience of your applications when they get restarted without warning.
If you’ve set up a bonded network interface for your cluster traffic, this should be a non-event. The traffic should fail over to the secondary link so seamlessly that the cluster doesn't even flinch. The node won't be marked as "down," and no HA failover should be triggered. This quick test provides immense peace of mind in your network architecture.
It’s this kind of baked-in resilience that has cemented Proxmox VE's place in the market. As an open-source platform, it commands a solid 0.90% market share, supporting over 3,000 customers. Its adoption by companies ranging from small businesses to giants like Samsung Electronics shows just how scalable and reliable it is. You can see more on how its features stack up in the virtualization landscape on servermania.com.
Verifying Successful HA Events in the Logs
After every test, you need to become a detective. Don't just take the GUI's word for it; dive into the logs to see the blow-by-blow of what really happened.
SSH into a live node and tail the system logs with a command like journalctl -f. You can also grep through /var/log/syslog for specific HA-related services like pve-ha-lrm (Local Resource Manager) and pve-ha-crm (Cluster Resource Manager).
You're looking for clear, explicit log entries confirming that a node was declared offline, that fencing was successful, and that services were relocated and started on a new host. These logs are your definitive proof that your Proxmox HA cluster worked exactly as designed.
Common Questions About Proxmox HA
When you start digging into Proxmox High Availability, a few key questions always seem to pop up. Getting these sorted out early on is the difference between a smooth deployment and a series of late-night headaches. Let's walk through some of the most common things people ask when planning their first HA cluster.
These aren't just technical trivia; the answers shape your entire cluster design, from hardware purchasing to your recovery strategy. Nailing these fundamentals is your first step toward building something genuinely resilient.
How Many Nodes Do I Really Need for a Proxmox HA Cluster?
The hard and fast rule for a stable, production-ready Proxmox HA cluster is a minimum of three physical nodes. This isn't an arbitrary number—it’s a direct requirement for the cluster’s decision-making system, known as quorum.
Think of it like a vote. With only two nodes, if one fails, the survivor can't achieve a majority. To avoid a dangerous "split-brain" situation where both nodes think they're in charge (which leads to data corruption), the cluster's HA manager simply stops. A three-node setup, however, allows one node to go down while the other two can still form a majority, vote, and safely carry on with migrating your services.
Can I Get Away With Mixing Different Hardware?
Technically, yes, you can. But in a real-world production environment, it's a bad idea that you'll likely regret. The biggest headache you'll run into is live migration. For a VM to seamlessly move from one host to another, the CPUs need to be compatible—ideally from the same vendor and family.
If you try to live-migrate between wildly different CPUs, the process will almost certainly fail. Proxmox does offer a workaround by setting a generic CPU type like 'kvm64', but this often means sacrificing performance because you're hiding advanced CPU features from the virtual machine. For your own sanity and the stability of your cluster, stick with identical or at least very similar hardware.
What Happens If My Shared Storage Goes Down?
Your shared storage is the single point of failure that can bring everything grinding to a halt. It’s the one component that every single node depends on. If your central iSCSI SAN or NFS server goes offline, your entire HA cluster is dead in the water. No VMs can be started, moved, or recovered because their virtual disks are gone.
This is exactly why distributed storage systems like Ceph are a game-changer for Proxmox HA. Ceph builds the storage directly into your cluster nodes, making the storage layer itself highly available. If one node (and its disks) fails, the data is still safe on replicas sitting on other nodes, allowing VMs to be recovered almost instantly.
Why Is Fencing Such a Big Deal?
Fencing is the cluster's ultimate safety net. It's the mechanism that prevents a misbehaving node from corrupting all of your data. Let's say a node drops off the network but is actually still running and has an active connection to your shared storage. If the HA manager just assumes it's dead and restarts its VMs on another node, you now have two machines writing to the same virtual disk simultaneously. That’s how you destroy data.
Fencing uses a completely separate, out-of-band channel (like a server's IPMI, iDRAC, or ILO port) to forcefully power off the unresponsive node. This ensures the rogue node is well and truly offline before its services are safely brought back up on a healthy one. Running an HA cluster without reliable fencing is playing with fire.
For businesses that would rather not get into the weeds of managing this level of infrastructure, looking into Linux managed services can be a great way to get expert help for these kinds of critical systems.
At Soraxus, we provide the enterprise-grade bare metal servers and resilient infrastructure needed to build a powerful Proxmox HA cluster. With full root access, out-of-band management for reliable fencing, and advanced DDoS mitigation, you get the control and security required to keep your mission-critical applications online.