How to Host a Game Server: The Guide to a Lag-Free Experience
Soraxus Assistant
January 16, 2026 • 25 min read

So, you're ready to host your own game server. The journey starts with a crucial decision that will shape everything else: choosing your hosting model. This isn't just about picking a server; it's about defining the foundation for your community's entire experience, impacting performance, cost, and how much control you have.
Choosing Your Game Server Hosting Foundation
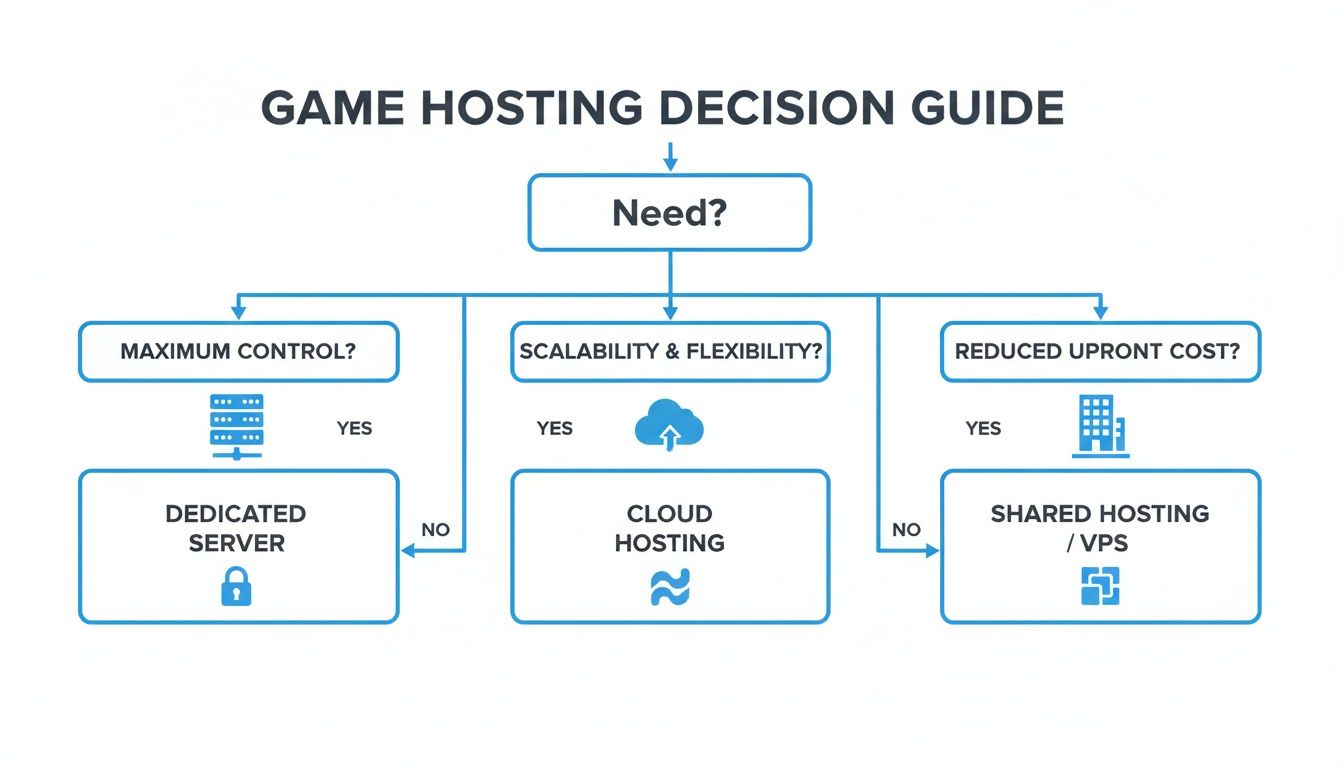
Before we get into the nitty-gritty of CPU clocks and firewall rules, we need to decide where your server will physically or virtually live. Think of it as choosing the plot of land before building the house. Each option—bare metal, cloud, and colocation—offers a distinct mix of power, flexibility, and cost. Getting this right from the start is key.
The game server market is booming, expanding from USD 2.18 billion to an expected USD 5.7 billion by 2034. While you'll see a lot of options out there, dedicated servers remain the gold standard for any game where performance is paramount. For competitive FPS titles or sprawling MMOs, low latency isn't a luxury; it's a requirement.
Bare Metal for Uncontended Performance
A bare metal server is exactly what it sounds like: a physical machine that is 100% yours. No noisy neighbors, no shared resources. You get every single cycle of the CPU, every byte of RAM, and all the I/O from the storage. This direct, uncontended access to the hardware is why it's the top pick for serious game communities and providers.
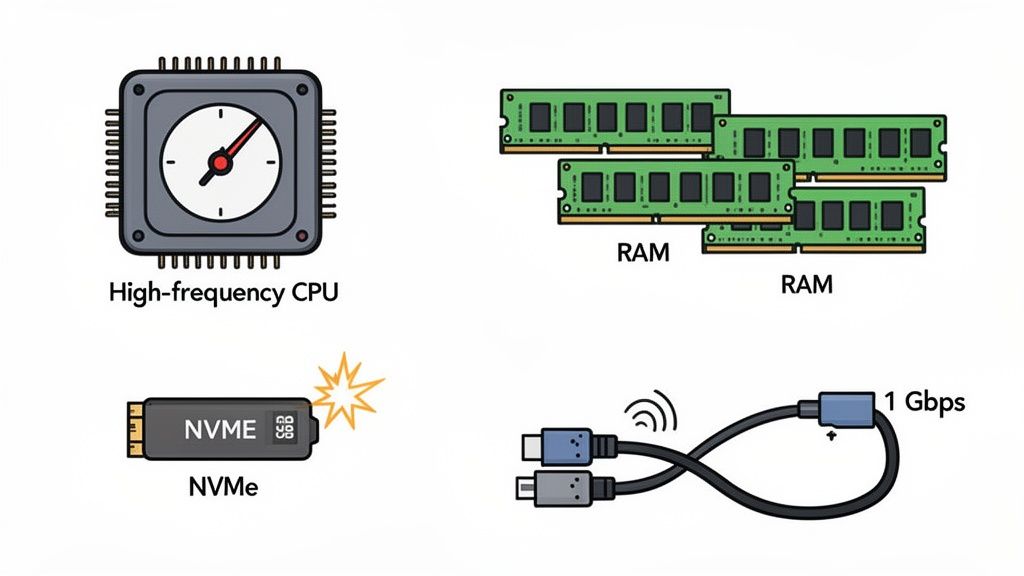
When you're running a game, especially one with a ton of mods, every millisecond matters. Take a heavily modded Ark: Survival Evolved server, for example—a game famous for its high resource demands. On a bare metal box with a high-frequency CPU and blazing-fast Gen 4/5 NVMe drives, players get those instant map loads and rock-solid gameplay, free from the lag spikes you often see in shared environments.
Cloud Instances for Ultimate Flexibility
Cloud hosting swings the pendulum in a different direction, prioritizing on-demand scalability over raw, dedicated power. With a cloud instance, you’re running on a virtual machine that sips from a massive pool of shared hardware resources. This is perfect if your server needs are unpredictable or you need to launch and destroy servers on the fly.
A game developer, for instance, could use cloud instances to spin up a dozen test environments across different global regions to test a new patch, then shut them all down a few hours later. The pay-as-you-go model is great for short-term projects or games with wildly fluctuating player counts. The trade-off? That convenience usually comes with a higher price tag for the same level of performance you'd get from bare metal.
The core trade-off is simple: Bare metal gives you raw, guaranteed power for consistent low latency, while the cloud provides unmatched speed in deployment and scalability. Your choice depends on whether peak performance or operational agility is your top priority.
Colocation for Full Hardware Ownership
Colocation is the path for those who want to own their gear but need a world-class facility to keep it in. You buy your own server hardware and then rent the rack space, power, cooling, and network connection from a professional data center.
This flowchart can help you visualize the decision-making process based on what's most important to you:
This model is a fantastic fit for established game hosting companies or large-scale communities with the budget and technical know-how to manage their own physical machines. For example, a large hosting provider might choose colocation to deploy a custom-built fleet of servers optimized specifically for hosting hundreds of Minecraft instances. This gives them total control over their hardware stack while leaning on the data center's redundant power, advanced cooling, and top-tier physical security. If you want to learn more, you can check out the specifics of using colocation for your infrastructure.
Comparing Game Server Hosting Models
To make things even clearer, let's break down how these three models stack up against each other side-by-side.
| Feature | Bare Metal Server | Cloud Hosting | Colocation |
|---|---|---|---|
| Performance | Highest, with dedicated, uncontended resources. | Variable; can be affected by other users ("noisy neighbors"). | Highest, equivalent to bare metal but with your own hardware. |
| Control | Full root/admin access to a pre-configured machine. | Full control over the virtual instance, but not the underlying hardware. | Absolute control over both hardware and software. |
| Scalability | Manual; requires migrating to a new server for major upgrades. | High; resources can be scaled up or down in minutes. | Manual; requires physically upgrading or adding new hardware. |
| Cost Structure | Predictable monthly or annual fees. | Pay-as-you-go; can be complex and hard to predict. | High initial hardware cost, plus recurring facility fees. |
| Best For | Performance-critical games, stable communities, GSPs. | Development, testing, games with fluctuating player counts. | Large-scale providers, experts who own and manage their own gear. |
Ultimately, the right choice comes down to balancing your need for raw power, your desire for control, and your budget. Each path has its merits, so weigh them against your project's specific goals.
Matching Hardware and Network Specs to Your Game
So, you’ve picked your hosting model. Now for the fun part: choosing the engine that will power your game world. The hardware and network you select aren't just line items on an invoice; they're the absolute bedrock of your players' experience. I've seen it a hundred times—lag, painfully slow load times, and poor hit registration can almost always be traced back to underpowered or poorly matched components.
Think of it like building a high-end gaming PC, but instead of optimizing for your own monitor, you're building it to handle dozens, or even hundreds, of players at once. Every game has a unique resource footprint, and figuring that out is the key to building a server that doesn't just run, but excels.
Decoding CPU Requirements: Clock Speed vs. Core Count
The CPU is where all the magic happens—it processes every player action, NPC behavior, and world event. But here’s a common pitfall: just throwing more cores at the problem often doesn't help. The real secret is knowing if your game relies on single-thread performance.
Many of the most popular game servers—think Minecraft, V Rising, or Factorio—are notoriously single-threaded. This means the main game loop chugs along on a single CPU core. For these games, a CPU with a blistering clock speed (measured in GHz) is king. A high-frequency processor simply chews through instructions faster, which directly slashes server tick lag and keeps things smooth.
On the other hand, some modern games are built to spread the load. For instance, some larger sandbox survival games can offload physics calculations and AI pathfinding to separate threads. These servers can delegate tasks like physics calculations, AI pathfinding, and network packets across multiple cores. Before you lock in a processor, do a little digging into your game's engine. It'll tell you whether to invest in raw speed or more cores.
Calculating Your RAM and Storage Needs
RAM is your server's short-term workspace. It holds the active game world, player data, and any mods you're running. Skimping on RAM is one of the fastest ways to guarantee crashes and frustrating performance drops.
Here's a practical formula I use:
- Find the Base Requirement: Check what the game developer recommends for a vanilla server.
- Account for Players: Add memory for each player slot. For many survival games, that's around 100-200MB per player.
- Buffer for Mods & Plugins: This is huge. Mods can be incredibly memory-hungry, so add a generous buffer.
Let's take a real-world example: A 50-player modded Rust server. You might start with a baseline of 8GB for the game itself, add 5GB for players (100MB x 50), and then tack on another 8GB+ just for plugins and world complexity. Suddenly, you're looking at needing a server with 24-32GB of RAM.
Storage speed is just as important. In this day and age, old-school hard disk drives (HDDs) are a massive bottleneck. You absolutely need to be running on NVMe SSDs (Non-Volatile Memory Express Solid-State Drives). Their insane read/write speeds make a night-and-day difference in world loading, saving, and pulling player data, which is critical for a snappy experience. It's exactly why modern bare metal server configurations are pairing powerful CPUs with the latest Gen 4/5 NVMe storage.
Demystifying Network Specifications
Finally, the network. It's the highway connecting your players to the game world. You can have the most powerful hardware on the planet, but a shoddy connection will kill the experience with high ping and packet loss.
Here’s what really matters:
- Port Speed: Don't even consider anything less than a 1 Gbps port. It’s the modern standard for any serious game server and ensures you have the bandwidth to handle all your players during peak hours.
- Low Latency Routes: The provider's network quality is paramount. You want a provider with globally optimized routes and peering agreements with major internet exchanges. This reduces the number of "hops" data takes to get to your players, which directly lowers their ping.
- Uplink Capacity: Make sure the data center itself has a massive pipe to the internet. For example, a data center with multiple 100 Gbps uplinks has far more headroom than one with a single 10 Gbps connection. This prevents your server's performance from getting dragged down by other noisy neighbors on the network.
Choosing the right components is a balancing act, but if you align your hardware and network specs with your game's specific needs, you'll be building on a solid foundation for a lag-free, top-tier server.
Laying the Software Foundation: OS and Control Panel
Alright, with your hardware decisions squared away, it’s time to breathe some life into that machine. This next step is all about laying the software foundation: installing an operating system (OS) and a control panel. These two components work together to create the environment where your game server will actually run. Getting this right from the start makes everything that comes after—management, performance tuning, and security—a whole lot easier.
The OS you pick has a huge say in how much of your server's power is actually available for the game. Sure, you could run Windows Server, but the reality is that the vast majority of game servers are powered by Linux. There's a good reason why pros swear by distributions like Ubuntu Server or Debian; they're incredibly stable, secure, and ridiculously lightweight. A bare-bones Linux install sips resources, leaving almost all of your RAM and CPU for the game itself, which is exactly what you want.
Getting the Operating System in Place
When you fire up a new bare metal server, you’ll usually have two paths for installing an OS. The first is the simple route: automated provisioning. You just pick your OS from a provider's list, and their system does all the heavy lifting for you. It's fast, easy, and gets you up and running in minutes.
The second method is for those who want total control: using out-of-band management like IPMI or iDRAC. This is a game-changer. It gives you a direct, low-level connection to your server that works completely independently of the main OS. It's like having a virtual keyboard, monitor, and mouse plugged right into the machine, even if it's sitting in a data center across the country.
Out-of-band access is your "get out of jail free" card. It lets you mount an OS installation file (.iso) and do a fresh install from scratch. This is invaluable if a server crashes and won't boot, or if you need to install a niche OS that isn't on the automated list. For example, if a bad firewall rule locks you out of SSH, IPMI is the only way to get back in and fix it. It guarantees you can always get to the console, no matter what state the server is in.
Once your OS is up and running, don't jump straight to the game install. First things first: create a non-root user for your day-to-day work and do some basic system hardening. This means running updates on all packages and setting up the firewall. These aren't optional steps; they're crucial for locking down your server from the get-go.
Making Your Life Easier with a Control Panel
You could absolutely manage everything from the command line if you wanted to, but a game server control panel can be a lifesaver. These are web-based dashboards built specifically for running game servers, and they turn what would be complex command-line tasks into simple clicks.
A solid control panel just automates the tedious stuff, freeing you up to focus on your community.
- One-Click Installs: Forget wrestling with scripts. You can deploy servers for games like Valheim, Counter-Strike, or Palworld in seconds.
- Painless Updates: Keep game servers and mods current automatically. No more manual file transfers to get the latest content.
- Simple Management: A clean web dashboard lets you start and stop the server, tweak settings, and see how much CPU and RAM you're using.
- Automated Backups: Set up a schedule to back up your game worlds and configs. This is your safety net against data loss.
Think about updating a modded Minecraft server. Manually, you'd have to stop the server, FTP into it, download a bunch of new files, pray they're all compatible, and then restart everything. With a panel, you literally just click an "Update" button. That abstraction is what makes running one—or even dozens—of game servers a sane and manageable job.
Bringing Your Server to Life & Locking It Down
Now that the OS and control panel are humming along, we get to the fun part: turning that machine into a living, breathing game world. This is where you'll install the actual game server files, tweak the settings to create your unique player experience, and, just as importantly, secure your network. Getting this right is the difference between a high-performance server and a laggy, vulnerable one.
This isn't just about clicking an "install" button. It's about getting your hands dirty with configuration files and understanding how to shield your server from the outside world. A well-configured game server is stable, and a locked-down network is your first and most critical line of defense.
Installing and Tweaking Your Game Server
First things first, you need the dedicated server files. Most developers make these freely available through tools like SteamCMD, a command-line version of Steam. It's the standard way to pull down and update server files directly from the source, guaranteeing you're always running the latest and greatest version.
Let’s walk through a real-world example with a Valheim server. Once you have SteamCMD set up, you'll run a quick command to download the server app. After it's done, you’ll find a folder full of files, and the important ones will have extensions like .ini, .json, or .conf. This is where the magic happens.
The real work of a server admin is done in these text files. You're not just launching an app; you're becoming the architect of an experience. Think of yourself as the dungeon master—setting the server name, password-protecting it, enabling or disabling PvP, and even tweaking resource drop rates.
Inside these files, you’ll typically find settings like:
- Server Name: What everyone sees in the server browser.
- Player Slots: The max number of players allowed on at once.
- Game Rules: Things like the difficulty, the speed of the day/night cycle, or special game modes.
- MOTD (Message of the Day): A custom welcome message that greets players when they connect.
Once you’ve saved your changes, it's time to fire it up. You'll usually launch the server by running an executable file from the command line, often with a few extra startup arguments to tell it which map to load or which network port to use.
Your Firewall: The First Line of Defense
Okay, the server is running, but don't give out the address just yet. Before anyone connects, you have to configure your firewall. Think of it as a bouncer at a club—it controls every single packet of data coming in or going out. By default, a good firewall blocks everything. Your job is to create specific exceptions for your game.
Every game server communicates over designated network ports. For a player's game to connect, it needs to send data to the right port on your server. The firewall's job is to open that specific door while keeping every other one bolted shut.
For example, a classic Minecraft: Java Edition server listens on TCP port 25565. To let players in, you need to add a firewall rule that explicitly allows incoming traffic on that one port. Any connection attempt on any other port gets dropped instantly. This simple step massively shrinks your server's vulnerability to attack.
A carefully configured firewall is absolutely non-negotiable for a few key reasons:
- Blocks Unauthorized Access: It stops bad actors from trying to exploit other services that might be running on your machine.
- Stops Common Scans: It deflects the automated tools hackers use to look for open, vulnerable ports.
- Improves Stability: By only letting in the traffic you expect, you cut down on random network noise that can cause lag and crashes.
Building a solid security foundation from day one is crucial. By meticulously installing the game, thoughtfully editing its configuration, and locking down the network with precise firewall rules, you create a stable, safe place for your community to thrive.
Implementing Advanced DDoS Protection
Once you've got your server firewall configured, it's time to tackle the single biggest threat to any game server: Distributed Denial-of-Service (DDoS) attacks. A standard firewall is great for stopping basic unauthorized access, but it's completely helpless against a real DDoS attack. For anyone serious about hosting reliable game servers, specialized protection isn't just an add-on; it's a foundational requirement.
These attacks aren't a simple, one-trick pony. They come in a variety of forms, each crafted to exploit a different weakness and bring your server to its knees. Knowing your enemy is the first step in building an effective defense.
Understanding the Attack Landscape
DDoS attacks are typically classified by which layer of the network they target. This distinction is crucial because each type demands a totally different mitigation approach.
-
Volumetric Attacks (Layer 3/4): This is the classic brute-force method and by far the most common. The goal is blunt: overwhelm your server's internet connection with so much garbage traffic that legitimate players get crowded out. Imagine a hundred-lane highway of junk data all trying to merge onto the single-lane road leading to your server. It just won't work. Practical examples include UDP floods or SYN floods that exhaust your network's capacity.
-
Application-Layer Attacks (Layer 7): These are the snipers of the DDoS world—far more sophisticated and often harder to stop. Instead of just clogging the network pipe, these attacks target the game server application itself. For instance, an attacker might send a barrage of complex, resource-heavy in-game commands that max out the CPU, causing the game process to crash and kicking everyone offline.
Because you can be hit by either a sledgehammer or a scalpel, you need a defense that's ready for both.
A common pitfall is thinking a server’s firewall is enough. Firewalls are built to enforce access rules, but they are stateful and can be easily exhausted by the sheer volume of a DDoS flood. More often than not, the firewall becomes the first thing to fail.
Why Enterprise-Grade Mitigation Is Essential
Let's be clear: in today's online gaming world, it's not a matter of if you'll be targeted, but when. With the explosion of esports and live streaming, game servers are prime targets. The North American game server market already accounts for about a 45% global share and is projected to hit USD 2.5 billion by 2030. This growth makes robust protection non-negotiable.
Industry analysts are already warning that by 2032, the 80% of gaming servers hit by attacks each year will need defenses with sub-second detection and at least 1.5+ Tbit/s of mitigation capacity just to survive.
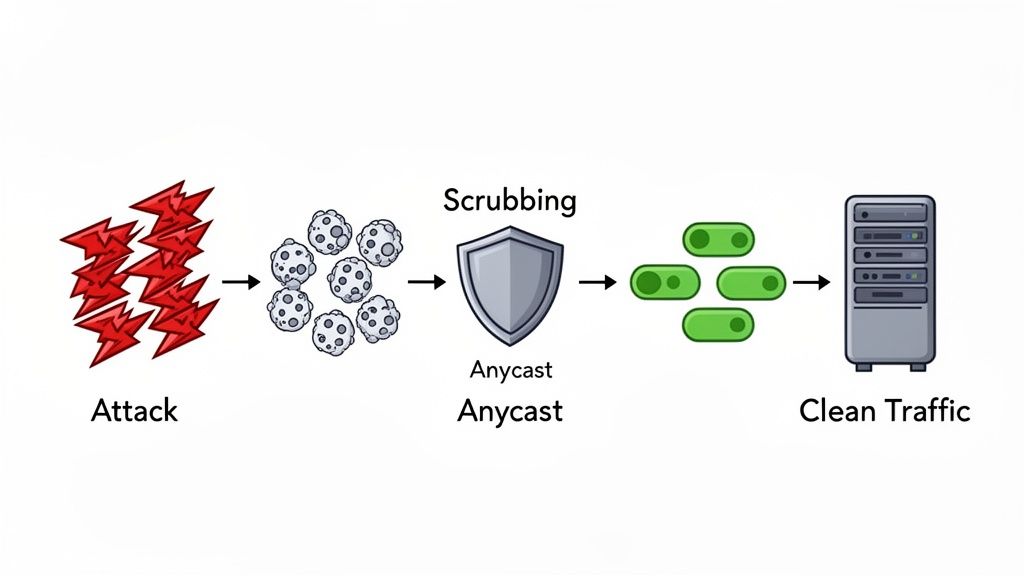
This is where a specialized, always-on DDoS protection service becomes indispensable. Unlike a simple firewall, these platforms are built on globally distributed infrastructure designed to absorb and filter colossal attacks long before they get anywhere near your server.
When you're vetting a protection service, here's what really matters:
- Massive Mitigation Capacity: The provider needs a global network that can handle terabit-scale attacks without blinking.
- Sub-Second Detection: The best systems spot an attack and start filtering it almost instantly, ensuring your players experience little to no disruption.
- Anycast Routing: This is the secret sauce. It routes all incoming traffic—both legitimate and malicious—to the closest of many "scrubbing centers" around the world.
- Distributed Scrubbing Centers: These are specialized data centers built for one purpose: inspecting traffic, surgically removing malicious packets, and forwarding only the clean, legitimate player data to your server.
This layered defense ensures that even if you're hit with a massive assault, your server only ever sees the good stuff. Your community stays online, your players stay happy, and your reputation remains intact. Taking the time to explore a provider's advanced DDoS mitigation capabilities is one of the most important investments you can make.
Keeping Your Server Healthy and Planning for Growth
Getting your game server up and running is a fantastic first step, but the real work starts now. Think of it like this: you've built the house, but now you need to maintain it and plan for extensions. A server that's stable and reliable is the foundation of a happy, loyal community, and that requires a bit of proactive work.
This isn't just about fixing things when they break. It's about creating a system that keeps your server running smoothly day in and day out, all while being ready to handle that awesome surge of new players you're working for. Let's dive into how to monitor, protect, and prepare your server for the long haul.
Automated Backups and Smart Monitoring
If you take one thing away from this guide, let it be this: always have a backup. I've seen it happen too many times—a corrupted world file or a simple admin mistake can erase hundreds, even thousands, of hours of player progress. That's a surefire way to kill a community. Don't let it happen to you.
Setting up automated backups is your number one priority.
- Most game control panels come with scheduling tools built right in. Use them!
- If you're more hands-on, a simple Cron job on Linux can do the trick. A practical example would be a script that tars up your
worlddirectory and uploads it to off-site storage at 4 AM every morning. Just set it to run during off-peak hours when your server is quiet.
Focus on backing up the essentials: your world files, player data, and any custom server configs. And whatever you do, store those backups somewhere else. Sticking them on the same machine is like keeping your spare key on the same keychain as your main key—if you lose one, you lose both.
Once your backup strategy is solid, it's time to get a handle on real-time monitoring. You need to know what's happening under the hood. Keeping an eye on CPU load, RAM usage, and network traffic will help you spot performance issues before they turn into game-breaking lag. Your hosting provider likely offers some basic stats, but for a deeper look, a tool like htop in the terminal or a dedicated monitoring dashboard will give you the granular detail you need.
Pro Tip: Don't ignore those weird spikes in resource usage. A sudden jump in CPU might mean a new plugin is eating up resources, or it could be the first sign that your hardware is struggling to keep up with your growing player count. Catching this early is the difference between a quick fix and a server-wide lag fest.
Automation and Scaling Up Your Rig
As your community gets bigger, the time you spend on routine tasks will grow right along with it. This is where a little automation can be a lifesaver. You can write simple scripts to handle the repetitive stuff, freeing you up to actually play the game and interact with your members.
Here are a few easy wins for automation:
- Scheduled Restarts: Set up a daily or nightly restart to clear out memory and keep performance snappy.
- Automatic Updates: Create a script that automatically checks for and applies new game updates so you don't have to do it manually.
Sooner or later, you’ll reach a point where your current hardware just can't keep up, no matter how much you optimize. That's a good problem to have! It means you're growing. The first step is usually scaling up—upgrading your existing machine by adding more RAM or swapping in a CPU with a faster clock speed.
When even a maxed-out single server isn't enough, it's time to scale out. This means adding more servers to your setup to distribute the load. A practical example is a large Minecraft network that runs its main hub world on one server, different game modes (like Skyblock or Factions) on separate servers, and a proxy server to direct players between them. This is where a hosting provider with 24/7 support and rapid deployment becomes incredibly valuable. Having an expert team ready to help you spin up new instances can make all the difference when you're managing a thriving, expanding game world.
Common Questions on Hosting Game Servers
Getting into game server hosting, whether you're a pro or just starting out, always comes with a few head-scratchers. Let's tackle some of the most frequent questions I hear from people setting up their own servers.
How Much RAM Do I Really Need?
This is the classic "it depends" question, but I can give you some real-world guideposts. The game itself, your max player count, and especially your mod list are the three biggest factors.
For instance, you might get a small vanilla Minecraft server running for a few friends on 4GB of RAM. But if you're launching a heavily modded server for a game like Ark: Survival Evolved or a big Rust community, you'll be looking at 32GB or even 64GB just to keep things from lagging into oblivion.
My best advice? Start with the game developer’s official specs as your absolute minimum. Then, be honest about your ambitions. Always add a healthy buffer for the number of players you want and the mods you'll inevitably add down the line.
What's the Best OS for a Game Server?
This one's easy: Linux. Specifically, a lightweight distribution like Ubuntu Server or Debian is the gold standard in the hosting world, and for good reason. They are incredibly stable and sip resources, leaving more power for what actually matters—your game.
Think of it this way: every bit of CPU and RAM your operating system uses is a bit that your game server can't. A lean Linux OS frees up those precious resources, which translates directly into a smoother, more responsive experience for your players.
You'll also find that the overwhelming majority of dedicated game server files are built and tested for Linux first. Sticking with Linux means better compatibility and access to a massive community that has already solved almost any problem you can think of.
How Do I Stop a DDoS Attack?
Let's be blunt: your server's basic firewall stands zero chance against a serious DDoS attack. The only real defense is to have your server with a provider that offers specialized, always-on DDoS mitigation. This isn't just a software setting; it's a massive, network-level defense system.
When you're vetting a host, here’s what you should be looking for:
- Massive Capacity: The network needs to be able to absorb enormous attacks, well over 1 Tbit/s.
- Layered Defense: It must protect against simple volumetric floods (Layers 3/4) and the trickier application-layer attacks (Layer 7) that target the game itself.
- Instant Response: The system has to detect and start scrubbing malicious traffic in under a second.
This kind of professional protection acts like a shield, filtering out all the junk traffic before it ever even sees your server. This is how you keep your game online and available for your actual players during an attack.
Can I Run Multiple Games on One Server?
Absolutely. Running multiple game instances on a single bare metal machine is a smart, cost-effective way to manage different communities or game modes. It’s a very common practice.
Each game server will operate as its own process, but they'll all be sharing the same pool of CPU cores, RAM, and network bandwidth. For example, you could run a 10-player Valheim server, a 24-player Counter-Strike server, and a small Terraria server on a single machine with a powerful CPU and 32GB of RAM. The trick is to stay on top of resource management. You have to keep a close eye on the machine's overall load to make sure a sudden player spike on one game doesn't start causing lag for everyone else.
Ready to build a high-performance, lag-free gaming experience? Soraxus provides the enterprise-grade bare metal servers and advanced DDoS protection you need to launch, scale, and secure your community. Explore our powerful infrastructure solutions at https://soraxus.com.